Adjusting Fluorescent Images
Processing a fluorescent image mainly consists of adjusting the background and the brightness to improve the quality of the image. Cytosketch provides tools that make adjusting fluorescent images substantially faster, easier and more consistent.
The adjustments to the image are non-destructive, this means that the adjustments do not degrade the quality of the image and it means that you can always reset the adjustments to the original values.
This section describes the various ways to adjust fluorescent images in Cytosketch.
Table of Content
- Fluorescent Image Controls Overview
- Automatically Adjusting Images
- Automatically Adjusting the Brightness
- Adjusting the Brightness using the Area Brightness Tool
- Automatically Adjusting the Background
- Adjusting the Background using the Area Background Tool
- How to Get Back to the Original Image
- Changing the Color of a Channel
- Turning Individual Channels On and Off
Fluorescent Image Controls Overview
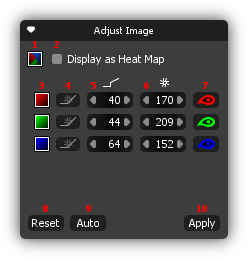
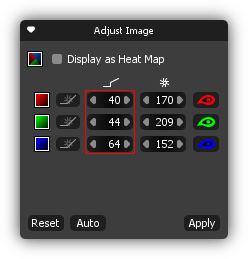
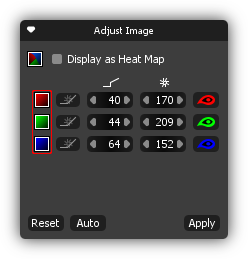
This section provides a quick overview of the controls that are available in the Adjust Image box when a fluorescent image is selected. Move the mouse over the screen shot below to see a short description of the individual controls or over the description to see the corresponding controls on the screen shot.
|
|


Automatically Adjusting Images
It's easy - select the images to adjust and click the Auto button
![]() in the Adjust Image box or press +
simultaneously.
in the Adjust Image box or press +
simultaneously.
Automatically Adjusting Brightness
The brightness of a fluorescent image is generally increased to make weak fluorescence signal visible. This section describes how to adjust the brightness using the automatic brightness function.
- Select the images to adjust, go to and then select or press + simultaneously. The brightness of all visible channels is automatically increased.
- To further increase the brightness use the Area Brightness Tool
 or fine tune each channel individually using the controllers in the control box.
Adjusting Brightness using Area Brightness Tool
If the automatic brightness
function
did not increase the signal well enough, follow the steps below to further
increase the brightness using the Brightness Tool ![]() .
.
- Activate the Brightness Tool by clicking the Brightness Tool button
or pressing the key.
- Move the cursor to the area that needs to be brighter.
- Click on this area and the brightness of all visible channels is increased based on the brightest pixel in the selected area.
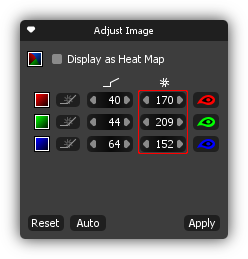
- To fine tune each channel individually use the controllers in the control box.
Tip:
To easily adjust the brightness with the area brightness tool, only work with one channel at a time.
Click the eye icons ![]() in the Adjust Image box
to turn channels on and off.
in the Adjust Image box
to turn channels on and off.
Automatically Adjusting Background
This section describes how to remove background fluorescent using the automatic background function.
- Select the images to adjust, go to and then select or press + simultaneously. The background of all visible channels is automatically adjusted.
- To further remove background use the Area Background Tool
 or fine tune each channel individually using the controllers in the control box.
Adjusting Background using Area Background Tool
If the automatic background
function
did not remove the background well enough, follow the steps below to further
remove background using the Background Tool ![]() .
.
- Activate the Background Tool by clicking the Background Tool button
or pressing the key.
- Move the cursor to the area with background fluorescence.
- Click on this area and the background of all visible channels is removed.
- To fine tune each channel individually use the controllers in the control box.
Tip:
To easily adjust the background with the area background tool, only work with one channel at a time.
Click the eye icons ![]() in the Adjust Image box
to turn channels on and off.
in the Adjust Image box
to turn channels on and off.
How to Get Back to the Original Image
- Select the image to reset.
-
Click
 in the Adjust Image box
and the adjustments values are reset to the original values.
in the Adjust Image box
and the adjustments values are reset to the original values.
Changing the Color of a Channel
- Select the image by using the selection tool
 .
.
- Click the Color button
 in the Adjust Image box
and
select a new color from the list.
in the Adjust Image box
and
select a new color from the list.
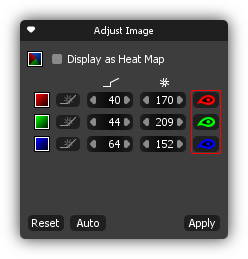
Turning Individual Channels On and Off
- Select the image by using the selection tool .
- Click the Eye icon
 in the Adjust Image box to turn
the
channels on and off.
in the Adjust Image box to turn
the
channels on and off.
Tip:
To quickly turn channels on and off use the keyboard shortcuts. You can find a list of all available shortcuts on the Reference Sheet page.